Вступ:
У цьому уроці, рухаючись кроками, ми зберемо робот "Маніпулятор".
Відео:
Для складання нам знадобиться кріплення:
| Найменування | Кількість, прим. | |
|---|---|---|
| 1 | Гайка М3 | 10 |
| 2 | Гвинт М3х6 | 9 |
| 3 | Гвинт М3х8 | 10 |
| 4 | Гвинт М3х10 | 5 |
| 5 | Гвинт М3х12 | 7 |
| 6 | Гвинт М3х20 | 4 |
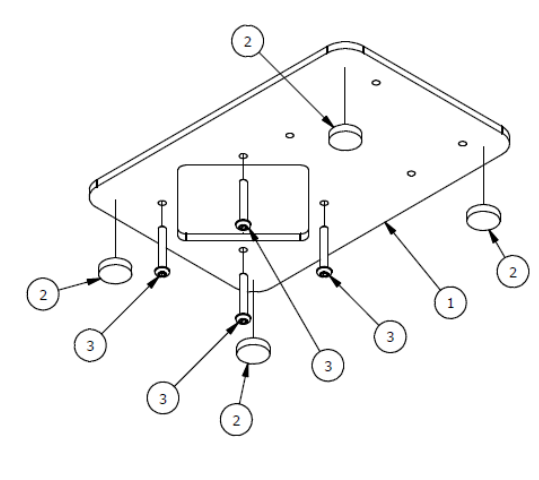
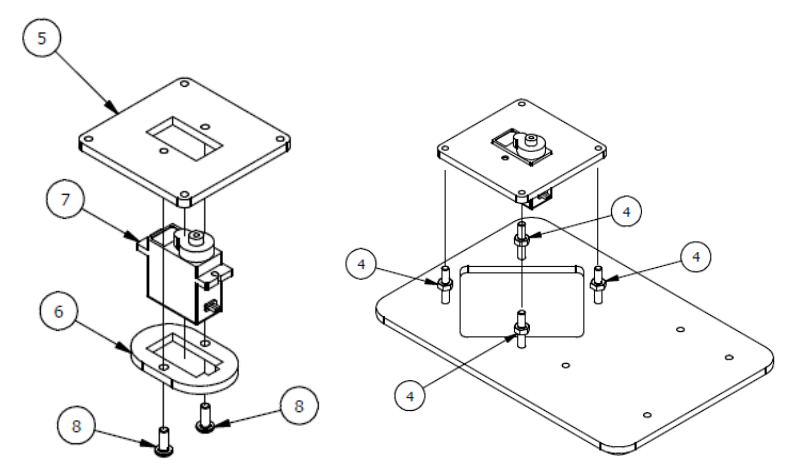
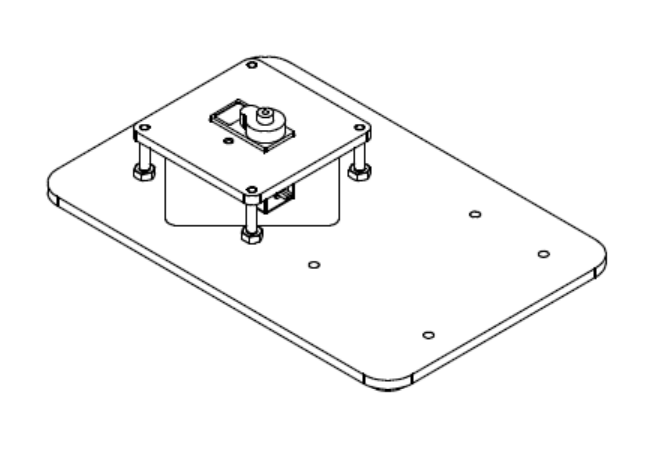
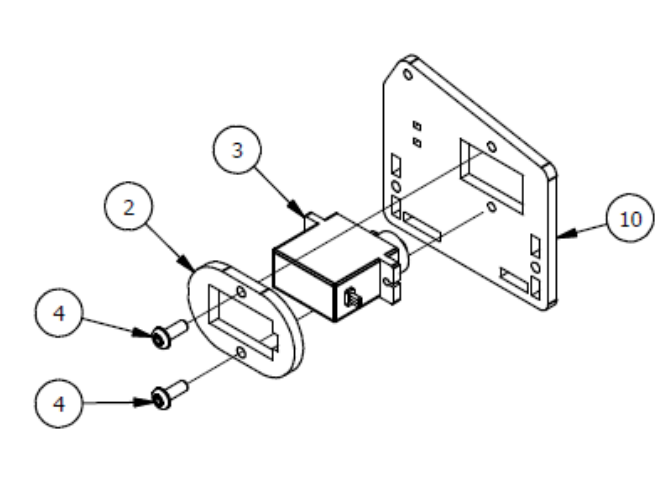
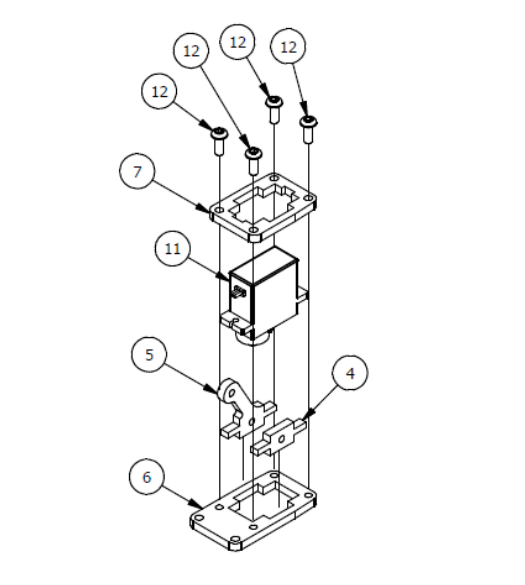
Крок 1
Список деталей до Кроку 1
Якщо Ви використовуєте для складання Мікросервопривід MG90S , необхідно відклеїти з нього наклейки! в іншому випадку він буде дуже туго встановлюватися, внаслідок чого можете поламати кріплення!
| Номер позиції | Кількість | Назва |
|---|---|---|
| 1 | 1 | Підстава |
| 3 | 4 | М3х20мм гвинт |
| 4 | 4 | М3 гайка |
| 5 | 1 | Опорна пластина |
| 6 | 1 | Кріплення |
| 7 | 1 | Сервопривід |
| 8 | 2 | М3x8мм гвинт |
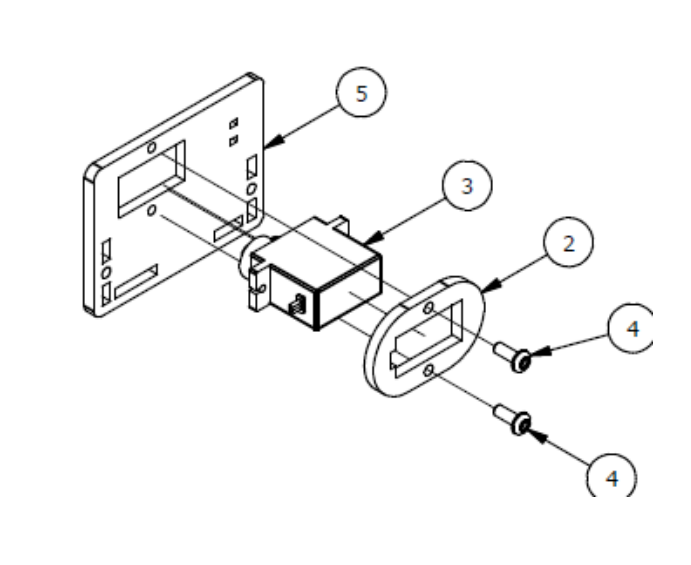
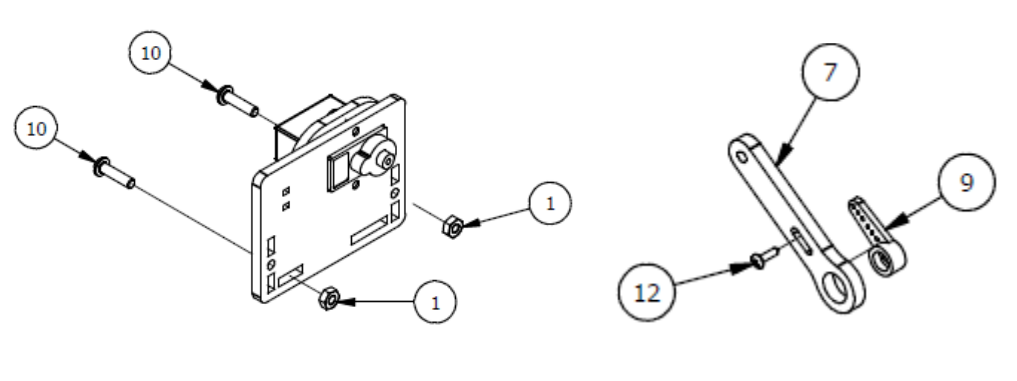
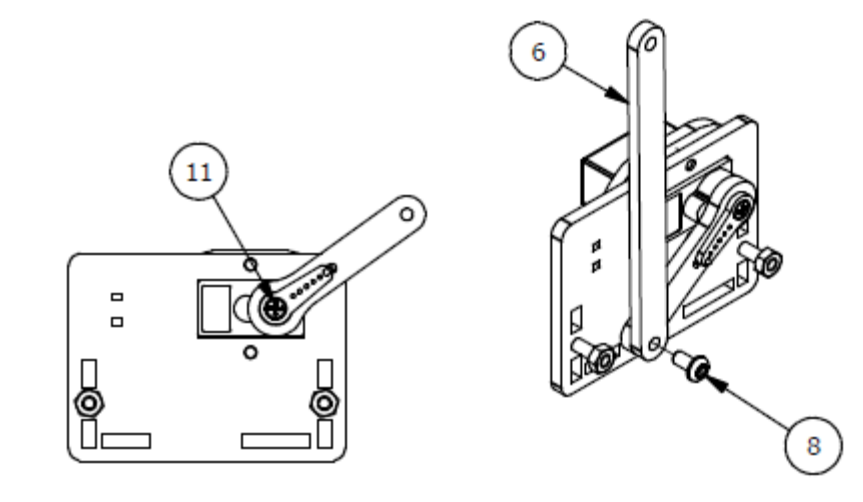
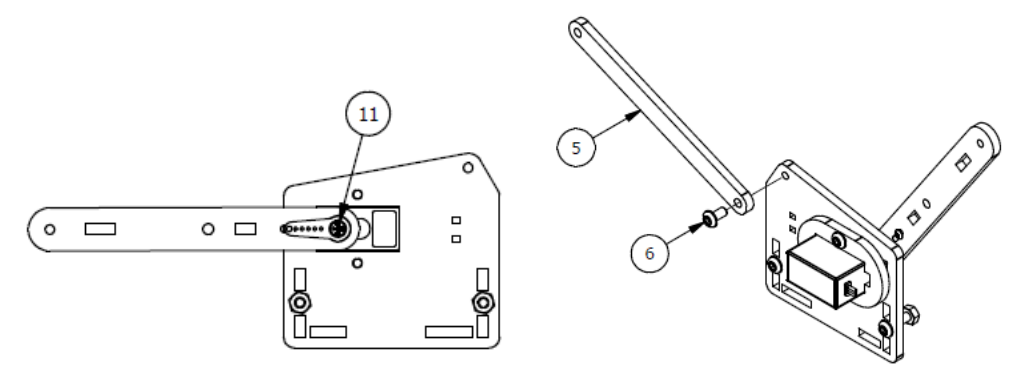
Крок 2
Список деталей до Кроку 2
| Номер позиції | Кількість | Назва |
|---|---|---|
| 1 | 2 | М3 гайка |
| 2 | 1 | Кріплення |
| 3 | 1 | Сервопривід |
| 4 | 2 | М3х8 гвинт |
| 5 | 1 | Основа лівої руки |
| 6 | 1 | Паралельне кріплення |
| 7 | 1 | Важіль руки |
| 8 | 1 | М3x6мм гвинт |
| 9 | 1 | Серво важіль |
| 10 | 2 | М3х12мм гвинт |
| 11 | 1 | Осьовий серверний гвинт |
| 12 | 1 | Фіксуючий серверний гвинт |
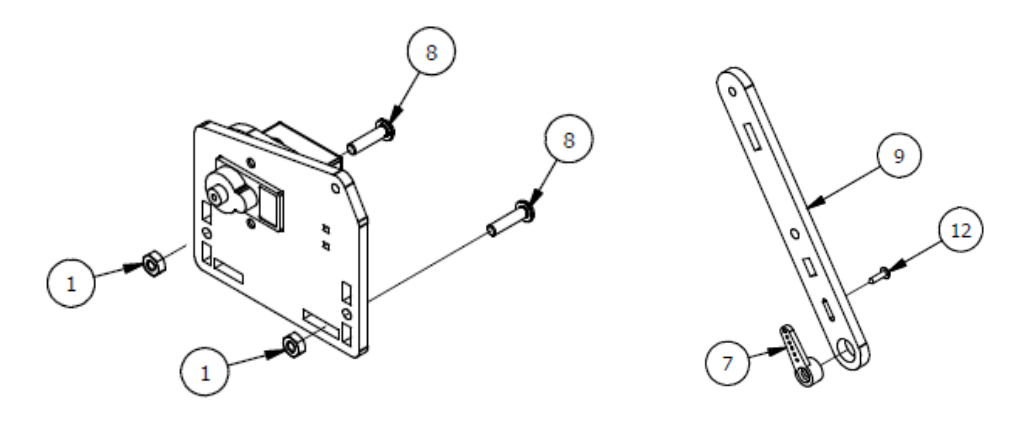
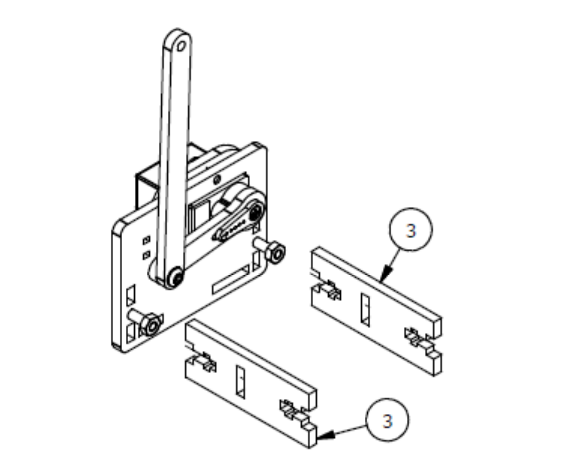
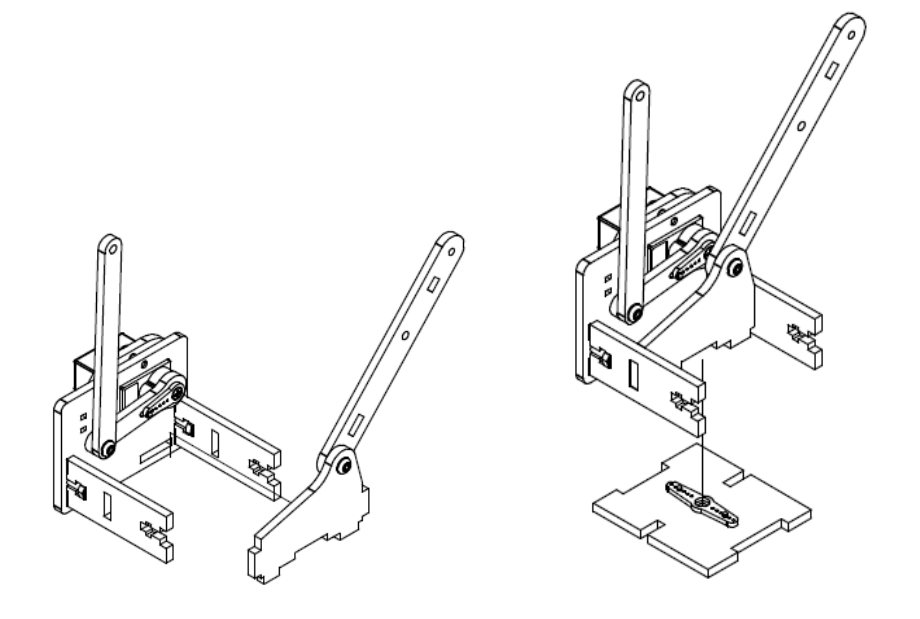
Крок 3
Список деталей до Кроку 3
| Номер позиції | Кількість | Назва |
|---|---|---|
| 1 | 2 | М3 гайка |
| 2 | 1 | Кріплення |
| 3 | 1 | Сервопривід |
| 4 | 2 | М3х8 гвинт |
| 5 | 1 | Паралельне кріплення |
| 6 | 1 | М3х6мм гвинт |
| 7 | 1 | Серво важіль |
| 8 | 2 | М3x6мм гвинт |
| 9 | 1 | Важіль правої руки |
| 10 | 1 | Основа правої руки |
| 11 | 1 | Осьовий серверний гвинт |
| 12 | 1 | Фіксуючий серверний гвинт |
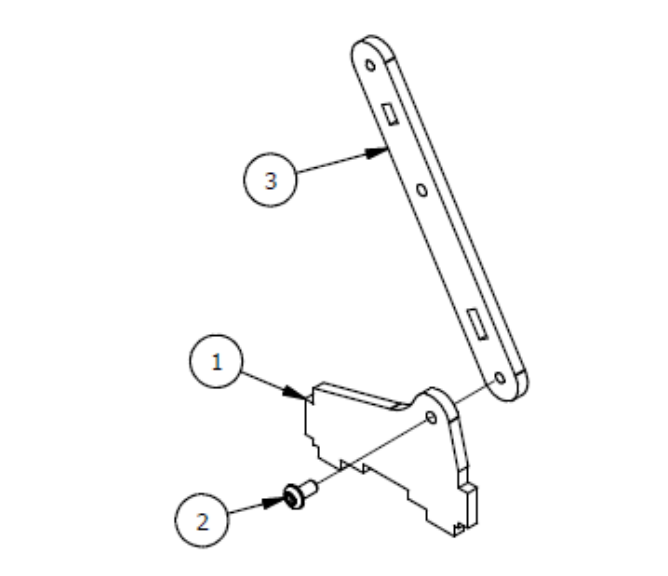
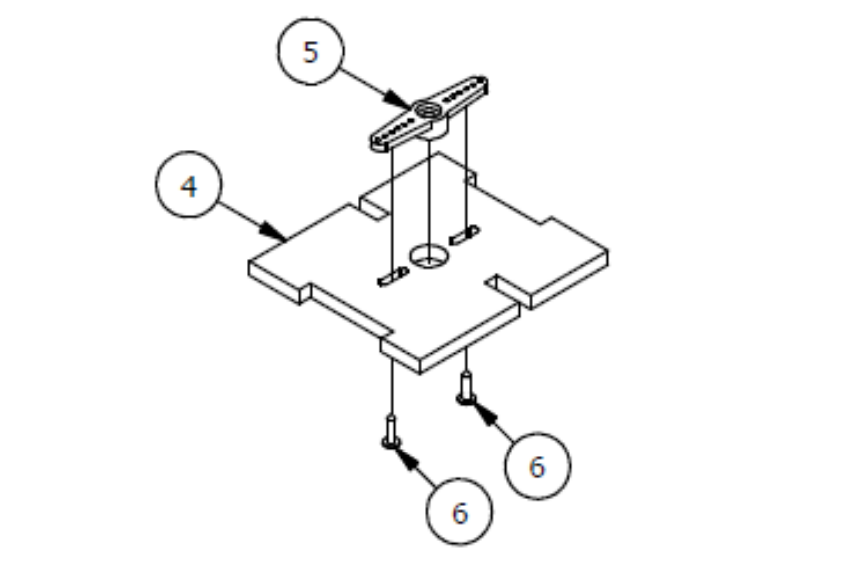
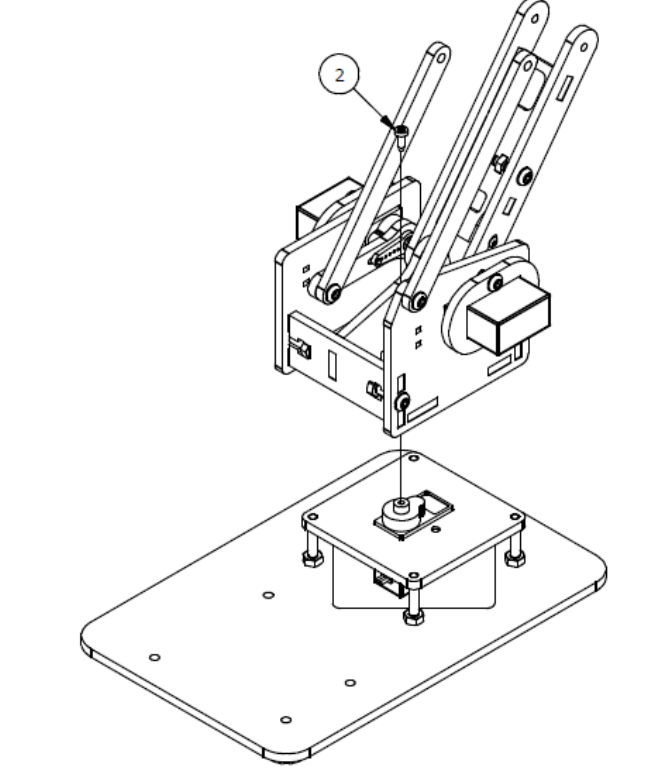
Крок 4
Список деталей до Кроку 4
| Номер позиції | Кількість | Назва |
|---|---|---|
| 1 | 1 | Кріплення вкладки лівої руки |
| 2 | 1 | М3х6мм гвинт |
| 3 | 1 | Балка лівої руки |
| 4 | 1 | Верхня кришка |
| 5 | 1 | Подвійний серво важіль |
| 6 | 2 | Фіксуючий серверний гвинт. |
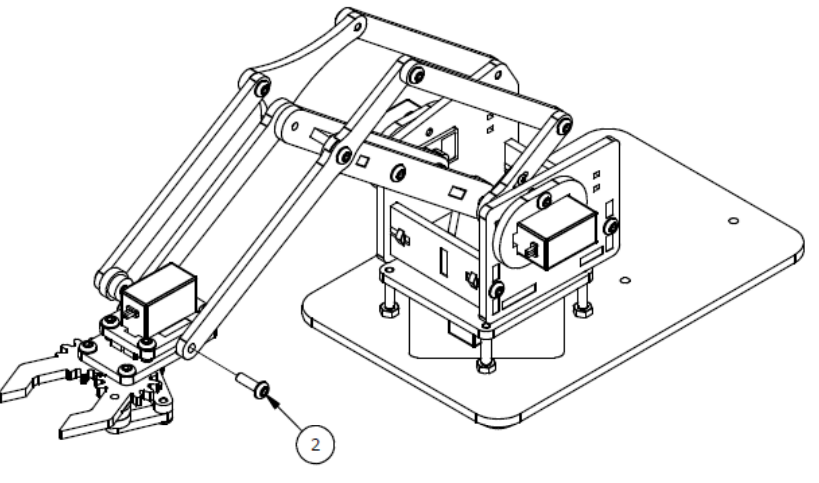
Крок 5
Список деталей до Кроку 5
| Номер позиції | Кількість | Назва |
|---|---|---|
| 1 | 2 | М3 гайка |
| 2 | 2 | М3х12мм гвинт |
| 3 | 1 | Траверса основи маніпулятора |
| 4 | 1 | Сполучне ребро жорсткості |

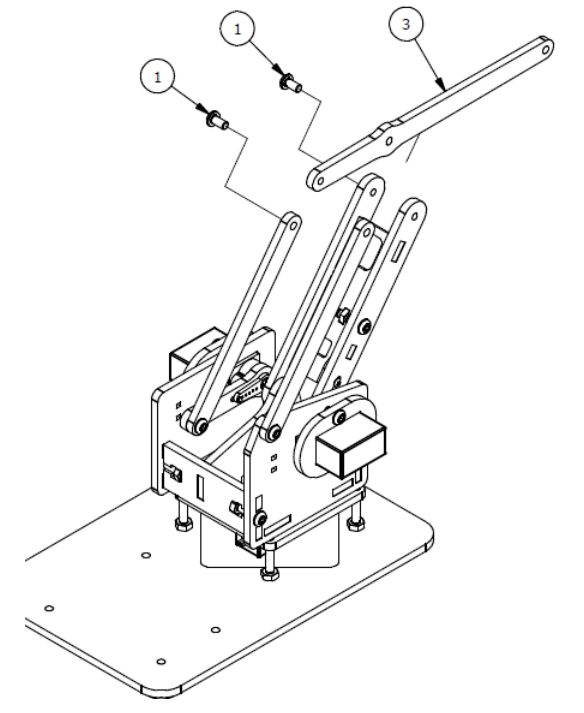
Крок 6
Список деталей до Кроку 6
| Номер позиції | Кількість | Назва |
|---|---|---|
| 1 | 2 | М3x6мм гвинт |
| 2 | 1 | Фіксуючий серверний гвинт |
| 3 | 1 | Балка лівого зап'ястя |
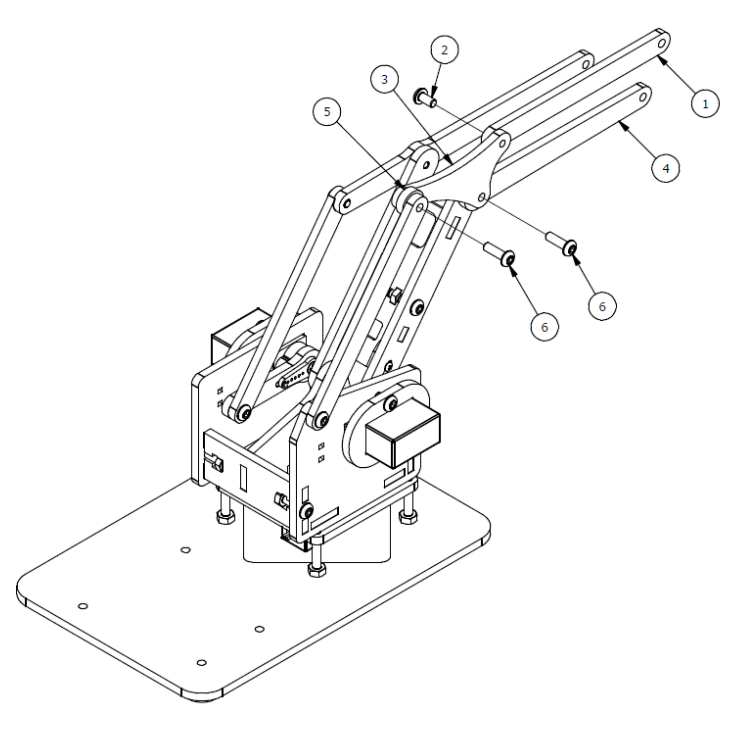
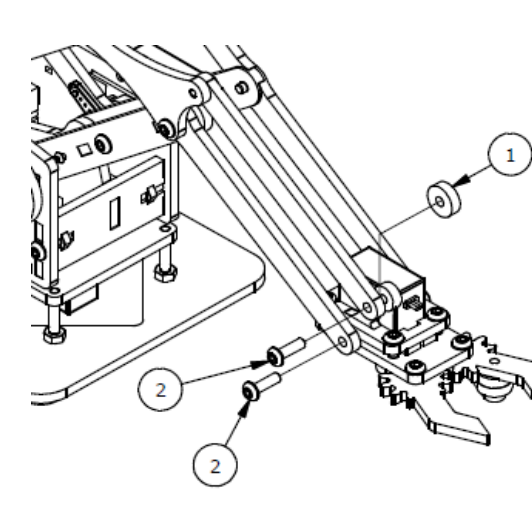
Крок 7
Список деталей до Кроку 7
| Номер позиції | Кількість | Назва |
|---|---|---|
| 1 | 1 | Паралельна балка |
| 2 | 1 | М3х6мм гвинт |
| 3 | 1 | Конектор |
| 4 | 1 | Балка правого зап'ястя |
| 5 | 1 | Прокладка |
| 6 | 2 | M3x10 гвинт |
Крок 8
Список деталей до Кроку 8
| Номер позиції | Кількість | Назва |
|---|---|---|
| 1 | 1 | Ліве захоплення |
| 2 | 1 | Праве захоплення |
| 3 | 1 | Привідний важіль |
| 4 | 1 | Ліве кріплення зап'ястя |
| 5 | 1 | Праве кріплення зап'ястя |
| 6 | 1 | Нижнє кріплення сервоприводу |
| 7 | 1 | Верхнє кріплення сервоприводу. |
| 8 | 1 | Привідний важіль |
| 9 | 1 | Осьовий серверний гвинт. |
| 10 | 1 | Серво важіль |
| 11 | 1 | Сервопривід |
| 12 | 4 | М3х8мм |
| 13 | 3 | М3х6мм |
| 14 | 1 | Фіксуючий серверний гвинт |
| 15 | 1 | М3х12мм гвинт |
| 16 | 2 | Прокладка |
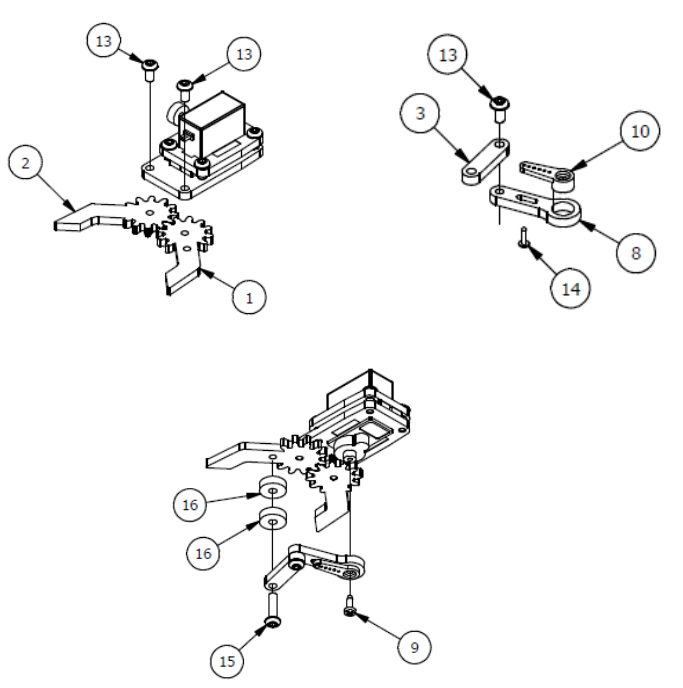
Крок 9
Список деталей до Кроку 9
| Номер позиції | Кількість | Назва |
|---|---|---|
| 1 | 1 | Прокладка |
| 2 | 3 | М3х10мм гвинт |
#include <Servo.h> // add the servo libraries
Servo myservo1; // create servo object to control a servo
Servo myservo2;
Servo myservo3;
Servo myservo4;
int pos1=90, pos2=90, pos3=90, pos4=90; // define the variable of 4 servo angle,and assign the initial value (that is the boot posture
//angle value)
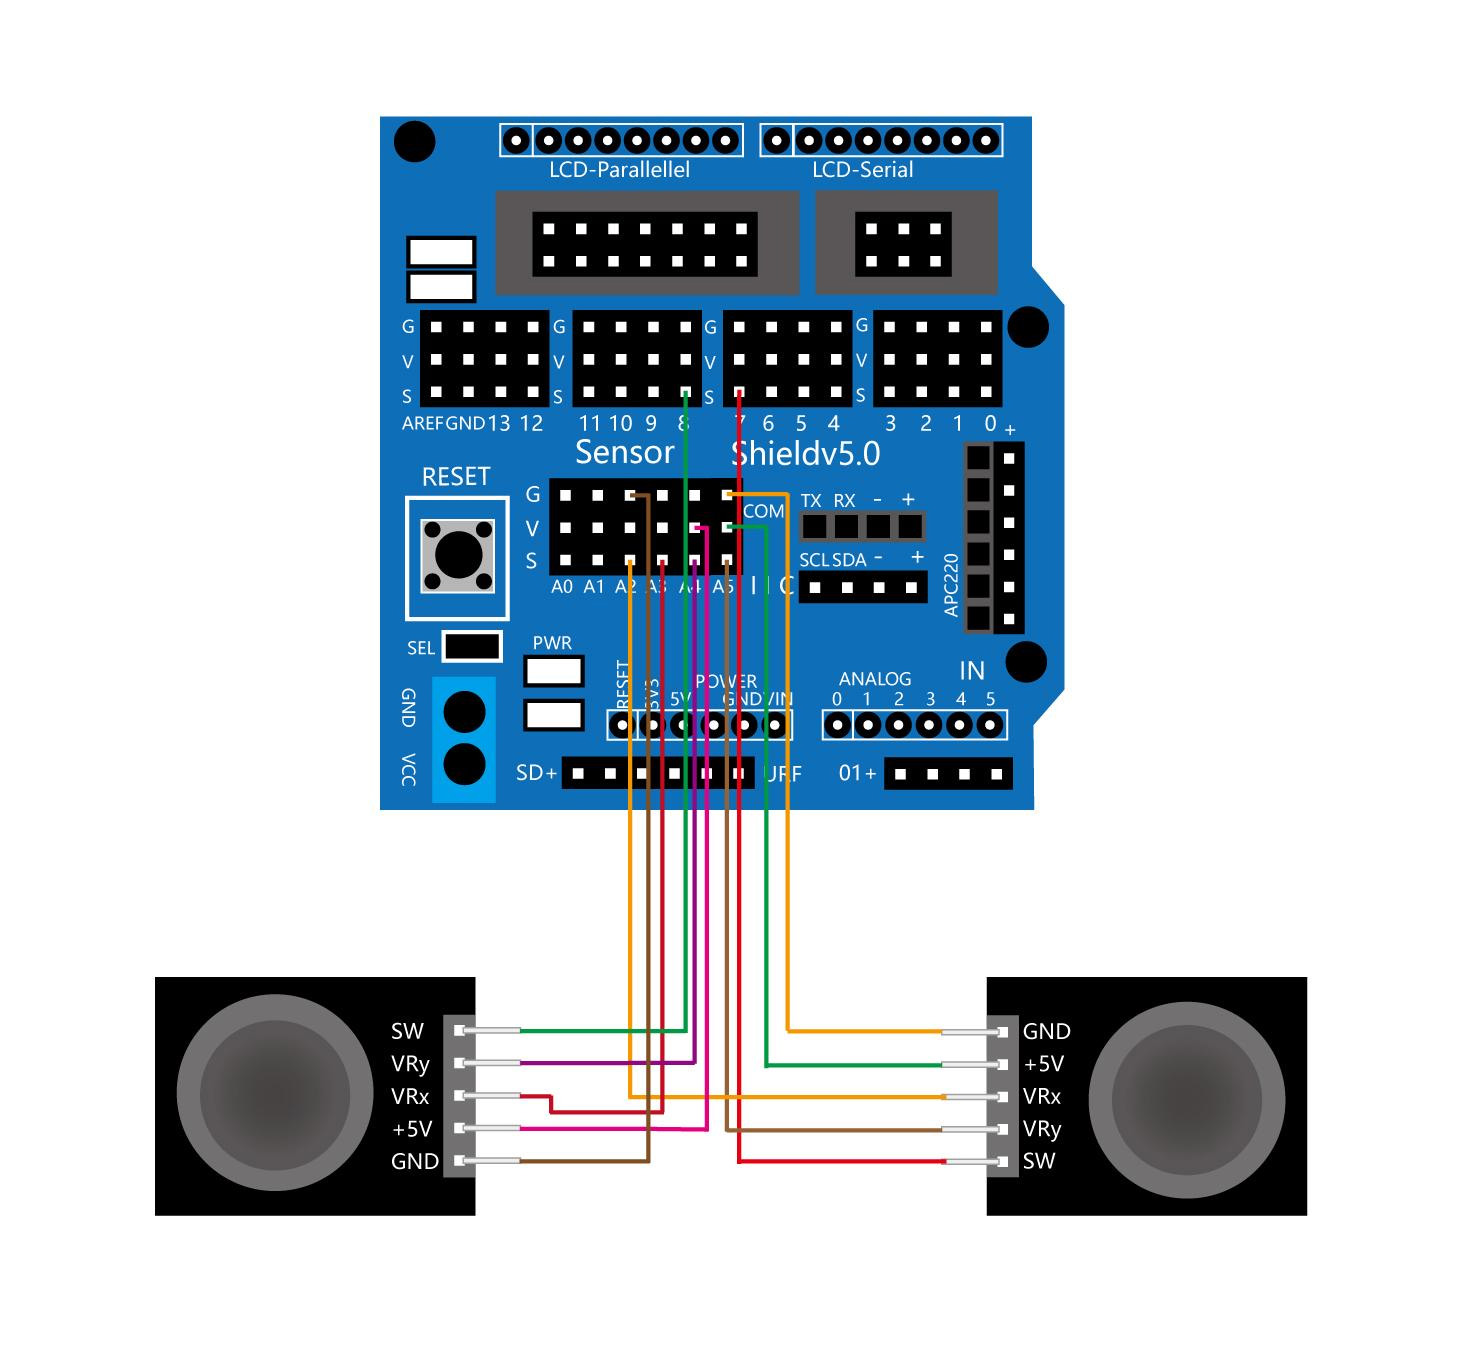
const int right_X = A2; // define the right X pin to A2
const int right_Y = A5; // define the right Y pin to A5
const int right_key = 7; // define the right key pin to 7(that is the value of Z)
const int left_X = A3; // define the left X pin to A3
const int left_Y = A4; // define the left X pin to A4
const int left_key = 8; //define the left key pin to 8(that is the value of Z)
int x1,y1,z1; // define the variable, used to save the joystick value it read.
int x2,y2,z2;
void setup()
{
// boot posture
myservo1.write(pos1);
delay(1000);
myservo2.write(pos2);
myservo3.write(pos3);
myservo4.write(pos4);
delay(1500);
pinMode(right_key, INPUT); // set the right/left key to INPUT
pinMode(left_key, INPUT);
Serial.begin(9600); // set the baud rate to 9600
}
void loop()
{
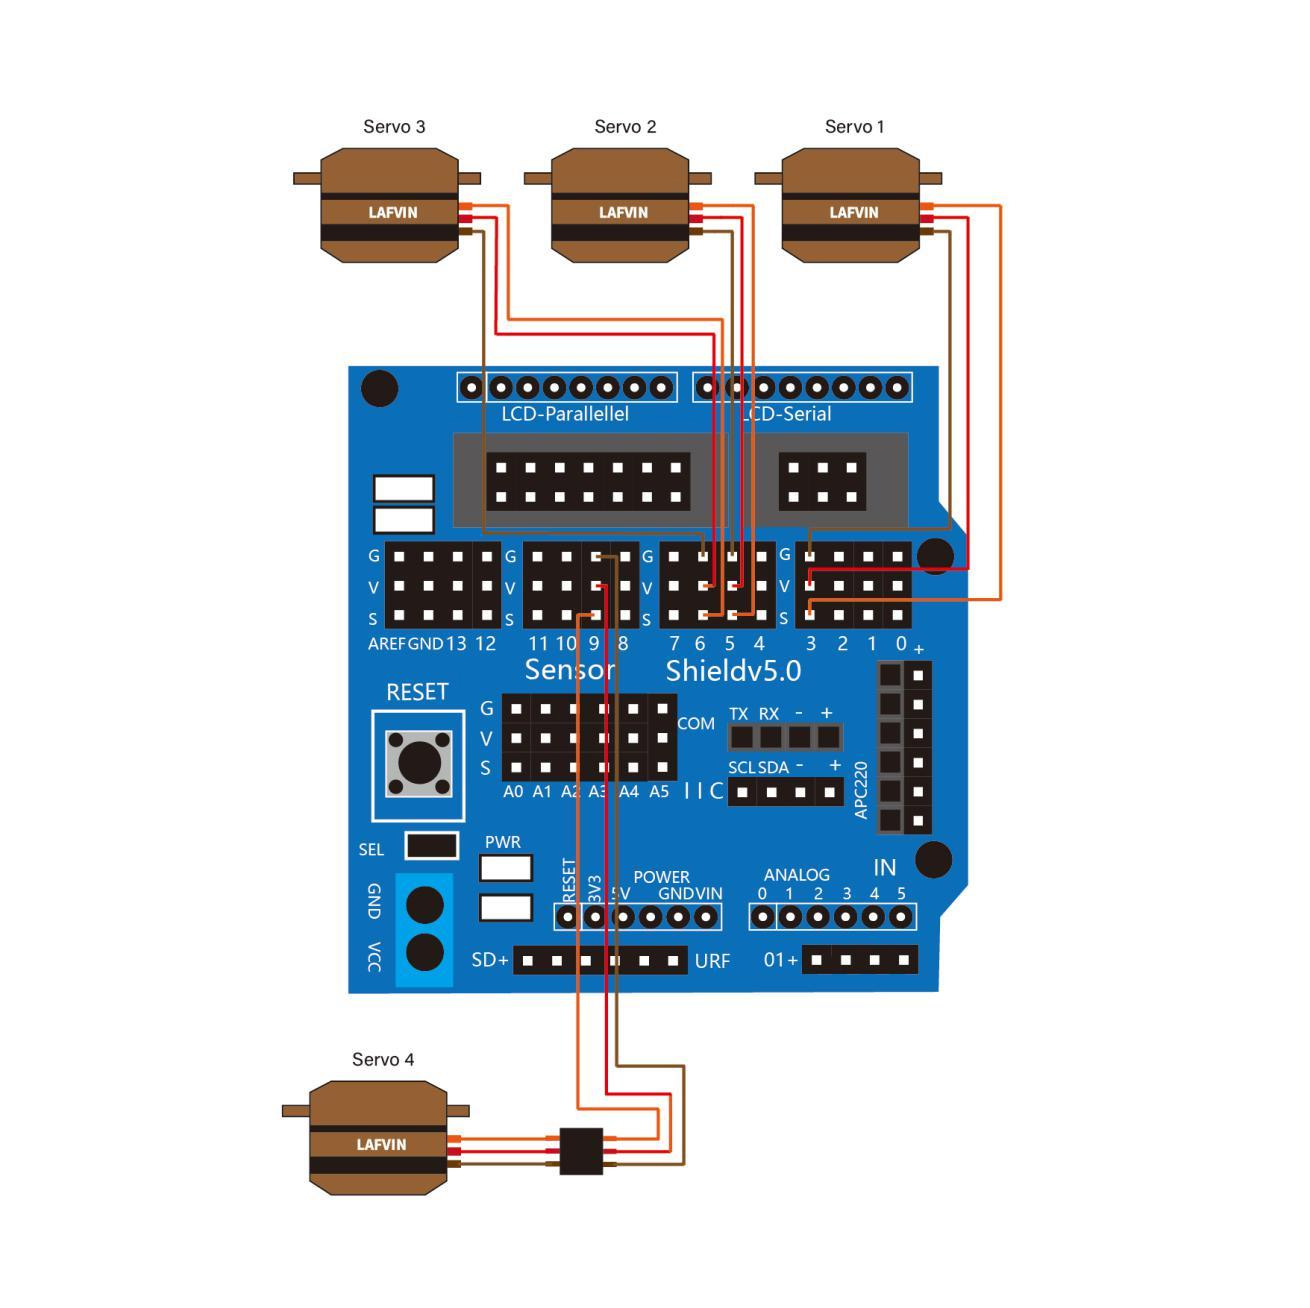
myservo1.attach(3); // set the control pin of servo 1 to D3 dizuo-servo1-3
myservo2.attach(5); // set the control pin of servo 2 to D5 arm-servo2-5
myservo3.attach(6); //set the control pin of servo 3 to D6 lower arm-servo-6
myservo4.attach(9); // set the control pin of servo 4 to D9 claw-servo-9
x2 = analogRead(right_X); //read the right X value
y2 = analogRead(right_Y); // read the right Y value
z2 = digitalRead(right_key); //// read the right Z value
x1 = analogRead(left_X); //read the left X value
y1 = analogRead(left_Y); //read the left Y value
z1 = digitalRead(left_key); // read the left Z value
//delay(5); // lower the speed overall
// claw
claw();
// rotate
turn();
// upper arm
upper_arm();
//lower arm
lower_arm();
}
//***************************************************
//claw
void claw()
{
//claw
if(x1<50) // if push the left joystick to the right
{
pos4=pos4+3;
myservo4.write(pos4); //servo 4 operates the motion, the claw gradually opens.
delay(5);
if(pos4>120) //limit the largest angle when open the claw
{
pos4=120;
}
}
if(x1>1000) ////if push the right joystick to the left
{
pos4=pos4-3;
myservo4.write(pos4); // servo 4 operates the action, claw is gradually closed.
delay(5);
if(pos4<45) //
{
pos4=45; //limit the largest angle when close the claw
}
}
}
//******************************************************/
// turn
void turn()
{
if(x2<50) //if push the right joystick to the let
{
pos1=pos1+3;
myservo1.write(pos1); // arm turns left
delay(5);
if(pos1>180) //limit the angle when turn right
{
pos1=180;
}
}
if(x2>1000) // if push the right joystick to the right
{
pos1=pos1-3;
myservo1.write(pos1); //servo 1 operates the motion, the arm turns right.
delay(5);
if(pos1<1) // limit the angle when turn left
{
pos1=1;
}
}
}
//**********************************************************/
// lower arm
void lower_arm()
{
if(y2>1000) // if push the right joystick downward
{
pos2=pos2-2;
myservo2.write(pos2); // lower arm will draw back
delay(5);
if(pos2<25) // limit the retracted angle
{
pos2=25;
}
}
if(y2<50) // if push the right joystick upward
{
pos2=pos2+2;
myservo2.write(pos2); // lower arm will stretch out
delay(5);
if(pos2>180) // limit the stretched angle
{
pos2=180;
}
}
}
//*************************************************************/
//upper arm
void upper_arm()
{
if(y1<50) // if push the left joystick downward
{
pos3=pos3-2;
myservo3.write(pos3); // upper arm will go down
delay(5);
if(pos3<1) // limit the angle when go down
{
pos3=1;
}
}
if(y1>1000) // if push the left joystick upward
{
pos3=pos3+2;
myservo3.write(pos3); // the upper arm will lift
delay(5);
if(pos3>135) //limit the lifting angle
{
pos3=135;
}
}
}